Water Ski | Slalom Ski Fin Settings - Instructions and How To's On Setting Up Your Ski
Looking for the perfect setup for your slalom and water ski? Miami Nautique has put together a group of resources that can help you figure out the best way to setup your ski's for riding at your level. These helpful guides will show you exactly how to setup your slalom and water skis.
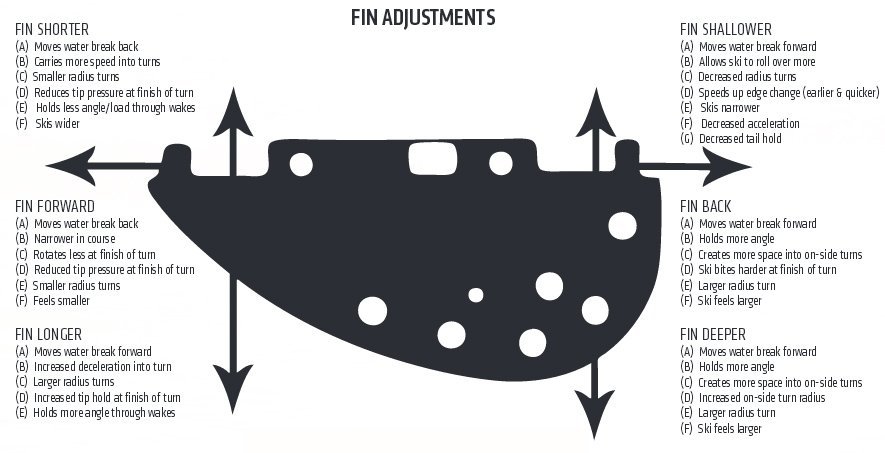
Fin Adjustments
The adjustable fin on the ski is designed to "fine-tune" performance characteristics which may vary between individual skiing styles, skier weight and boat speed. There are three types of adjustments that can be made to the fin: depth, length, and distance to the tail.
Distance to the Tail of the Ski
An adjustment forward (toward the tip of the ski) lifts the front and drops the tail during an on-side turn. An adjustment backward drives the front into the water and raises the tail.
Fin Depth
More depth improves stability and holding power, while less depth makes it easier to turn.
Fin Length
An increased fin length drives the tip of the ski into the water during the off-side turn. A fin with shorter length raises the tip of the ski.
Each type of adjustment will substantially change the performance of the ski. The less the leading edge of the fin is out of the ski, the more the fin will keep the front of the ski up. The longer the leading edge, the more it drives the front into the water.
In order to accurately verify results, only one type of adjustment should be made between ski rides. Do not exceed .020" of adjustment per ski ride. Exceeding this tolerance can result in unacceptable results and quick falls.
Once the ultimate fin position has been determined, mark and/or measure the fin position. Therefore, if the fin is accidentally moved the exact position can be easily readjusted.
![]()
Wing / Spoiler
The wing is designed to help slow the ski down as you approach the turns. The more angle you set on the wing, the faster your ski will decelerate into the turns. The tolerances for the wing angle should be kept between 6-10 degrees.
Adjustment Options
Problem Solution
Difficult to initiate turn Decrease fin depth, and/or move fin forward
Unstable and/or too fast into turns Increase fin depth and/or move fin backward
Too much ski tip in water on both left and right turns Increase fin depth
Too much ski in the water while turning off-side causing breaking at the waist
Too much ski in the water while turning on-side Move fin forward
Too much ski tip out of the water during on-side turns Move fin backward
Difficult to initiate angle across wakes Move fin forward
Ski overturns and gets too much angle across wakes Move fin backward and/or add depth Ski changes edges too slowly Decrease fin depth and/or move fin forward
Ski is too responsive Increase fin depth and/or move fin backward
INSTRUCTIONS:
To adjust fin settings: 1) Record wing angle and remove the wing. 2) Loosen Allen screws on the fin clamps to allow the fin to slide with only a slight pressure. 3) Adjust to desired settings using set screws. 4) Tighten Allen screws to hold fin tightly in place. 5) Check measurement after tightening screws as sometimes the fin will move while tightening 6) Replace wing to desired angle using D3 Skis angle gauges.
![]()
D3 Jump Ski Mounting Instructions:
Recommended Binding Placement
The following measurements are from the tail of the ski to the leading edge of the binding heel horseshoe.
Please use a 7/64” drill bit to drill pilot holes 1/4” deep. Do not drill any deeper. You must be sure to go through the aluminum screw retention plate just under the top-skin of the ski. All screws used
for mounting the binding MUST be in the screw retention plate. Failure to do this may create a weak point in the Jumper and
possibly cause it to break. This will not be covered under warranty. Always re-tighten your binding screws after the first couple uses.
68” Team Std Tip 27.25”
70” Team Std Tip 27.50”
72” Team Std Tip 27.75”
74” Team Std Tip 28.00”
76” Team Std Tip 28.25”
78” Team Std Tip 28.50”
80” Team Std Tip 28.75”
82” Nightmare 29.25”
84” Nightmare 29.50”
86” Nightmare 29.75”
88” Nightmare 30.00”
90” Nightmare 30.25”
92” Nightmare 30.50”
![]()
D3 Skis Trick Ski Mounting Instructions
Recommended Binding Placement
Find your inside ankle bone in your front boot.
This can only be done with your foot in the binding.
Mark this spot down on the binding plate.
This is your ANKLE centerline.
Find the centerline of your ski.
For 40”-42” skis put your ANKLE centerline .25” forward of the ski centerline. For 43”-45” put your ANKLE centerline.375” forward of the ski centerline.
Please only use screws that are provided with the trick ski to mount the front binding. (DO NOT USE SCREWS THAT COME WITH THE BINDING)
Please only use a hand screw driver to tighten the screws to avoid cross threading of the screw and insert.
Mounting a rear binding on a Rubber Edge or Hard Edge trick
Rear binding placement is according to personal preference.
Please use a 3/32”drill bit to drill pilot holes 1/4” deep. Do not drill any deeper. You must be sure to go through the aluminum screw retention plate just under the top-skin of the ski.
![]()